If you want to master how to do cornrows, this guide covers everything you need to know. Last updated: February 2026 by Darius Washington, Black Men’s Grooming Editor
I learned how to cornrow in my uncle’s barbershop when I was 14. He put a mannequin head in my lap, handed me a rat tail comb, and said “if you can section it clean, you can braid it clean.” That lesson stuck. Learning how to do cornrows is not about memorizing a YouTube tutorial. It is about understanding how your hair moves, how tension works, and how to build a pattern that holds for weeks.
This guide covers everything from prep to finish: washing and detangling, sectioning, the three-strand braiding technique, feeding hair in, tension control, and securing your ends. I also break down the most popular men’s cornrow patterns, including straight-back, zig-zag, side cornrows, cornrows with a fade, feed-in cornrows, and fishbone braids. Whether you are braiding your own hair or sitting in someone else’s chair, you need to understand the process.
If you only read one section, jump to the step-by-step braiding technique. If you want the full system from prep to maintenance, keep reading.
What Are Cornrows?: How To Do Cornrows
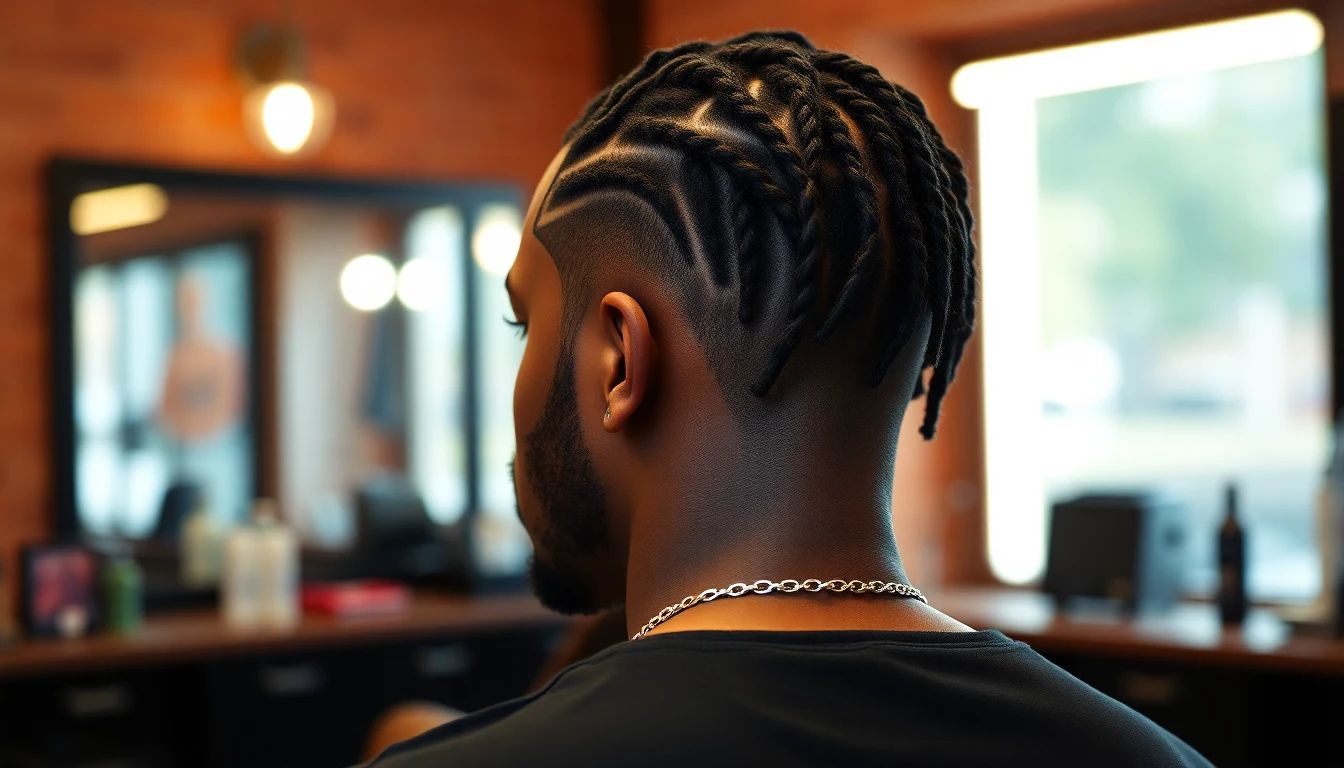
Cornrows are a braiding style where three strands of hair are woven flat against the scalp in continuous, raised rows. Unlike box braids or twists that hang freely, cornrows follow a defined path across the head, creating patterns that range from simple straight lines to complex geometric designs.

The technique has roots that stretch back thousands of years across the African continent. Cornrow patterns in West Africa historically signified age, religion, social status, kinship, and ethnicity. The Yoruba, Fulani, and Wolof peoples all developed distinct braiding traditions. In the Americas, cornrows carried forward through the African diaspora and became deeply embedded in Black culture, from everyday wear to high fashion to professional sports.
For men specifically, cornrows experienced a cultural resurgence in the 1990s and 2000s through figures like Allen Iverson, Ludacris, and Bow Wow. Today they remain one of the most versatile protective styles available. They work with fades, lineups, and longer natural hair. They protect your ends from damage. And when executed well, they look clean for two to four weeks with minimal daily maintenance.
The technique itself is straightforward once you understand it. The difficulty is in the execution: clean parts, consistent tension, and feeding hair smoothly into each braid. That is what separates a cornrow that lasts three weeks from one that unravels in three days.
Step 1: Prep Your Hair Before Braiding
Braiding on dirty or tangled hair is how you get cornrows that itch in two days and unravel in five. Prep is not optional. I have seen guys skip the wash and go straight to braiding, then wonder why their scalp is flaking by the end of week one. Your hair needs to be clean, conditioned, detangled, and moisturized before anyone picks up a comb.
Wash With a Moisturizing Shampoo
Use a sulfate-free moisturizing shampoo. You want to remove product buildup and oil without stripping your hair. Harsh shampoos leave 4B and 4C hair dry and brittle, which means more breakage during the braiding process. I recommend washing with lukewarm water, not hot. Hot water opens the cuticle too much and promotes frizz.
If you have been using heavy pomades, wave grease, or gels, you may need a clarifying wash first to cut through the buildup, followed by your regular moisturizing shampoo. One round of clarifying, one round of moisturizing. That is the sequence.
Condition Thoroughly
Apply a deep conditioner or a heavy leave-in treatment after washing. Cantu Shea Butter Leave-In Conditioner works well for 4B and 4C textures because it adds slip without weighing the hair down. You need slip for braiding. Hair that has slip lets your fingers glide through the strands without snagging or breaking.
Let the conditioner sit for five to 10 minutes, then rinse with cool water. Cool water closes the cuticle, seals in moisture, and gives your hair a smoother surface for braiding.
Detangle Section by Section
Never detangle your entire head at once. Work in four to six sections. Use a wide-tooth comb or a detangling brush, starting from the ends and working your way up to the roots. If you hit a knot, hold the hair above the knot so the tension does not pull from the root. Ripping through tangles is how you lose hair before the braiding even starts.
If you are working with 4C hair that has significant shrinkage, detangle while the conditioner is still in. The slip makes a real difference. You will lose less hair and the comb will move through more smoothly.
Moisturize Before Braiding
Once your hair is clean and detangled, apply a lightweight oil or moisturizing cream. SheaMoisture Jamaican Black Castor Oil is my go-to because it adds moisture and a little weight without making the hair greasy or slippery to braid. You want moisturized hair, not saturated hair. Too much product makes it hard to grip the strands. (We recommend this SFC Natural King Jamaican Black Castor.)
The goal of this entire prep phase is hair that is clean, hydrated, tangle-free, and slightly oiled. That is the canvas for clean cornrows. Skip any one of these steps and the braids will suffer.
Tools You Need for Cornrows
You do not need a professional braiding kit. You need seven items, most of which cost under $5.
| Tool | Purpose | What to Look For | Est. Cost |
|---|---|---|---|
| Rat tail comb | Creating clean parts and sections | Metal or carbon fiber tail (not plastic, it bends) | $3-8 |
| Wide-tooth comb | Detangling before braiding | Seamless teeth to prevent snagging | $3-5 |
| Sectioning clips | Holding hair out of the way while you work | Duck bill clips or butterfly clips | $3-6 |
| Edge control gel | Laying edges and smoothing flyaways along parts | Strong hold without flaking | $5-10 |
| Moisturizing oil or cream | Keeping hair pliable during braiding | Lightweight, non-greasy | $6-12 |
| Small rubber bands or thread | Securing braid ends | Snag-free rubber bands designed for braiding | $2-4 |
| Spray bottle with water | Re-moistening sections while braiding | Fine mist setting | $1-3 |
A carbon fiber rat tail comb is worth the extra few dollars. Plastic tails bend under pressure and give you wavy parts instead of straight ones. Your sections are only as clean as your parting tool.
For edge control, Design Essentials Natural Honey & Shea Edge Tamer gives you strong hold without the white residue some gels leave on darker skin. A little goes a long way. Apply with your fingertip, not the back of the jar.

Step 2: Sectioning Your Hair
Sectioning is where most beginners go wrong, and it is the single biggest factor in how your cornrows turn out. Sloppy sections mean uneven braids, crossed rows, and an overall look that reads as amateur. Take your time here. Clean sections make the braiding part easier, not harder.
How to Create Clean Parts
Use the tail of your rat tail comb. Place the point at your hairline where you want the part to begin. Draw the comb straight back toward the crown (or in whatever direction your chosen pattern requires) with steady, even pressure. Use the flat edge of the comb to push the hair on either side of the part away from the line.
For straight-back cornrows, your parts should run parallel from the front hairline to the nape of your neck. The rows should be evenly spaced. A good rule is to keep each section about the width of your index finger, roughly half an inch to three quarters of an inch wide. Thinner sections create more rows and a more intricate look, but they also take longer and require more precision.
Clip Sections as You Go
Once you part a section, clip the surrounding hair out of the way immediately. This prevents stray hairs from being pulled into the wrong braid, which is the most common cause of that messy “hairs crossing between rows” look. Work from one side of the head to the other, parting and clipping each row before you start braiding.
Section Width by Pattern
| Pattern | Recommended Section Width | Number of Rows (Average) |
|---|---|---|
| Straight-back (classic) | 1/2 to 3/4 inch | 8-14 rows |
| Zig-zag | 1/2 to 3/4 inch | 8-12 rows |
| Side cornrows | 1/2 to 1 inch | 6-10 rows |
| Feed-in cornrows | 3/4 to 1 inch | 6-10 rows |
| Fishbone | 1 to 1.5 inches (central braid) | 4-8 rows |
If this is your first time cornrowing your own hair, start with eight to 10 straight-back rows with half-inch sections. Wider sections are more forgiving. Once you can braid clean straight-back rows consistently, start experimenting with tighter sections and more complex patterns. Mastering how to do cornrows takes practice but delivers great results.

Step 3: The Three-Strand Cornrow Technique
Every cornrow, regardless of the pattern, uses the same fundamental technique: a three-strand underhand braid that feeds new hair from the scalp into each pass. Once you understand this motion, you can braid any pattern. The pattern just changes the direction. The technique stays the same.
Starting the Braid
- Take a small triangle of hair at the front of your section. This starter piece should be about the size of a dime. It will be the anchor for the entire row.
- Divide that starter triangle into three equal strands. Hold the left strand between your left thumb and index finger. Hold the right strand between your right thumb and index finger. The middle strand rests between your left middle and ring fingers.
- Cross the right strand under the middle strand. Not over. Under. This is what makes a cornrow lay flat against the scalp. Regular braids cross over, which makes them puff up. Cornrows cross under, which makes them hug the head.
- Cross the left strand under the new middle strand. That completes one full cycle. You should see a tiny ridge forming close to the scalp.
Feeding Hair In
This is what turns a regular braid into a cornrow. After each cross, you add a thin strip of hair from the scalp to the outer strand before crossing it under. Mastering how to do cornrows takes practice but delivers great results.
- After crossing the right strand under, use your pinky or ring finger to scoop a thin strip of hair from the right side of your section.
- Add that strip to the right strand. Combine them between your fingers.
- Cross the now-thickened right strand under the middle.
- Repeat on the left side. Scoop, add, cross under.
The key is consistency. Each feed-in should be roughly the same amount of hair. If you grab too much on one side, the braid bulges. If you grab too little, the braid thins out. Even feeds create even braids. That is the whole secret.
Maintaining Tension
Tension is what keeps your cornrows tight, neat, and long-lasting. But there is a critical line between snug and too tight.
The right tension feels firm. The braid sits flat against the scalp with no gaps between the braid and the skin. When you tug gently on the braid, it does not lift away from the head. Your scalp feels snug but not sore.

Too tight means pain. If you feel a burning or pulling sensation at the roots, the braid is too tight. Small white bumps along the hairline (called papules) are a sign of excessive tension. Headaches within the first few hours of braiding also indicate too much pull. Consistently tight braiding, especially at the hairline and temples, leads to traction alopecia, a form of hair loss caused by repeated tension on the follicle. This is not something that reverses easily.
If you are braiding your own hair, check in with yourself every few rows. If your scalp is throbbing, loosen up. A cornrow that lasts three weeks at moderate tension is better than a cornrow that lasts four weeks at the cost of your hairline.
Finishing and Securing the Ends
When you reach the end of the section (either at the nape for straight-back styles or wherever your pattern terminates), you will run out of scalp hair to feed in. At this point, continue braiding the three strands as a regular braid for another inch or two, then secure the end.
For securing, you have three options:
- Small snag-free rubber bands: Wrap two to three times around the end of the braid. Quick, easy, and works for all hair lengths.
- Braiding thread: Wind thread tightly around the last half inch. This is more traditional and holds better on longer braids.
- Burning or tucking (experienced braiders only): Some braiders use synthetic extensions and seal the ends with heat. If you are using your natural hair only, tucking the end under the last row with a small bobby pin also works.
If your hair is shorter than three inches, the ends may not braid far past the scalp. In that case, a dab of Jamaican Mango & Lime Locking Gel at the tip helps hold the last half inch together. Do not use too much. A pea-sized amount per braid end is enough. For more guidance, Healthline provides expert resources on Black men’s skincare.
Popular Cornrow Patterns for Men
The technique is the same for every pattern. What changes is the direction of the parts and the path the braid follows across the scalp. Here are the six patterns I see most in the shop, ranked from simplest to most advanced.
1. Straight-Back Cornrows
The classic. Parallel rows running from the front hairline straight to the nape. This is the pattern every beginner should learn first because the parts are simple parallel lines and the braids follow a straight path with no curves or redirections.
Works for: All hair lengths (minimum two inches), all head shapes, everyday wear.
Doesn’t work for: If you want a more dynamic or eye-catching pattern, straight-back can read as plain. It is the foundation, not the final destination.
If you are getting cornrows for the first time and want something reliable that any braider can execute well, straight-back is the call. Pair it with a taper fade on the sides for a clean contrast between the braided top and faded edges.
2. Zig-Zag Cornrows
The parts alternate direction at regular intervals, creating a zig-zag path across the scalp. The braids follow the same zig-zag path. This pattern requires more skill because you need to redirect the braid smoothly at each angle change without creating bumps or loose spots.
Works for: Guys who want visual interest without extensions or complex geometry. Minimum three inches of hair for the turns to hold.
Doesn’t work for: Beginners braiding their own hair. The angle transitions are difficult to execute on yourself, especially at the back of the head.
The key to clean zig-zag cornrows is parting the zig-zag pattern first, before you start braiding. Do not try to braid and redirect on the fly. Part the entire pattern with your rat tail comb, clip everything down, then braid each section following the established path.
3. Side Cornrows
Instead of running front to back, side cornrows run from one ear across to the other, or at a diagonal from the front hairline down to the opposite side of the nape. This creates a swept, asymmetric look that stands out from the typical straight-back.
Works for: Guys who want a different look without complicated patterns. The braids follow a single direction, just at an angle.
Doesn’t work for: Very short hair (under two inches). The lateral pull requires enough length to grip firmly, and short hair along the sides tends to slip out of braids that run against its natural growth direction.
I see side cornrows most often paired with a low fade on one side and full braids sweeping across the top and down the other side. The contrast between the faded skin and the braided length adds depth to the style.
4. Cornrows With a Fade
This is not a standalone braiding pattern. It is a combination style where cornrows cover the top and crown while the sides and back are faded with clippers. The fade can be a low fade, high fade, or anything in between.
Works for: Men who want the look of cornrows with the clean, low-maintenance sides of a fade. This is probably the most popular men’s cornrow style right now.
Doesn’t work for: DIY braiders who cannot also cut their own fade. You need a barber for the fade portion. Get the fade first, then braid the top.
The braiding on top follows whatever pattern you choose: straight-back, zig-zag, or side cornrows. The fade handles the transition. Tell your barber where you want the fade to stop and the braids to start. A curly hair fade guide can help you communicate the right blend point if you have tightly coiled hair on the sides.
5. Feed-In Cornrows
Feed-in cornrows start thin at the hairline and gradually get thicker as more hair is added. This creates a tapered, natural-looking start rather than a blunt, bulky beginning at the edge. The technique is the same three-strand underhand braid, but you begin with a very small starter piece (just a few strands) and increase the amount of hair you feed in with each pass for the first inch or two. Understanding how to do cornrows is key to a great grooming routine.
Works for: Men who want a sleeker, more refined look. Feed-ins lay flatter at the hairline and create less bulk at the starting point. They also reduce tension on the hairline because you are not pulling a thick section of hair from the very edge of your scalp. Understanding how to do cornrows is key to a great grooming routine.

Doesn’t work for: Very short hair (under two and a half inches). You need enough length to create the gradual buildup.
Feed-in cornrows are a go-to recommendation for men who have experienced hairline thinning from tight braids. By starting with less hair and less tension at the edge, you protect the most vulnerable part of your hairline. If you have noticed your temples thinning, switch to feed-ins.
6. Fishbone Cornrows
Fishbone braids feature a thick central cornrow with thinner braids branching off diagonally from each side, creating a pattern that resembles a fish skeleton. This is the most advanced pattern on this list and requires a skilled braider or significant practice.
Works for: Special occasions, statement styles, men who want maximum visual impact. Minimum three to four inches of hair.
Doesn’t work for: DIY beginners. The diagonal branching requires precise sectioning and the ability to braid in multiple directions from a central line. This is a “sit in a professional’s chair” style.
Fishbone cornrows take the longest to install (often two to three hours) but also tend to last the longest because the interlocking pattern creates more structural stability. If you are going to an event and want cornrows that turn heads, fishbone is the pattern.
How Long Do Cornrows Last?
Cornrows last two to four weeks on most men. That range depends on several factors:
| Factor | Effect on Duration | What You Can Control |
|---|---|---|
| Hair texture | 4C holds longest; 3C may loosen sooner | Choose patterns suited to your texture |
| Tension quality | Consistent tension = longer hold | Practice even braiding, avoid over-tightening |
| Night protection | Silk durag adds 1+ week of life | Wear a durag every night, no exceptions |
| Activity level | Sweat and friction loosen braids faster | Rinse scalp, re-tie durag after workouts |
| Product buildup | Heavy products attract lint and fuzz | Use lightweight oils, avoid heavy gels |
| Hair length | Longer hair holds braids longer | Wait until 3+ inches for best results |
My general rule: if you are wearing cornrows for everyday style, rebraid every two to three weeks. If you are wearing them as a protective style while growing your hair out (which I cover in our how to grow 4C hair guide), you can push to four weeks if the braids are still neat and your scalp is not irritated.
After four weeks, take them out. Period. Leaving cornrows in beyond four weeks leads to matting at the roots, excessive new growth that tangles around the braid base, and potential damage when you finally do take them down. The “set it and forget it” approach does not work with cornrows. Protective styling only protects if you maintain a healthy rebraid schedule.

Maintenance Between Rebraids
Once your cornrows are in, you cannot just ignore them. Two to five minutes of daily maintenance is the difference between cornrows that look fresh at week three and cornrows that look raggedy by day 10.
Daily Routine (2 Minutes)
- Mist your scalp lightly with water or a water-based scalp spray. The spray bottle from your tools list works fine. You are not soaking your hair. Just enough moisture to keep the scalp from drying out.
- Apply a lightweight oil to your scalp along the parts. Mielle Rosemary Mint Scalp Oil has a nozzle applicator that lets you target the parts directly without getting oil all over the braids. A few drops per row is enough.
- Smooth any flyaways along the edges with a small amount of edge control. Use your fingertip or a soft-bristle edge brush.
Every 2-3 Days
- Check your edges. The hairline braids loosen first because they get the most friction from hats, pillows, and hands. If the first half inch of a front row is coming loose, you can carefully rebraid just that section without taking down the entire head.
- Look for lint or fuzz. Dark cornrows attract visible lint, especially if you wear hoodies or beanies. A pair of tweezers or the pointed end of a rat tail comb can pick lint out without disturbing the braid.
Weekly
- Rinse your scalp. You do not need to fully wash and condition with cornrows in. Once a week, let lukewarm water run over your head in the shower and gently massage your scalp with your fingertips (not your nails). This removes sweat, oil, and light buildup. Do not scrub the braids themselves. Pat dry gently with a microfiber towel and let air dry.
- Re-assess overall neatness. By week two, you will see new growth at the roots creating a slight gap between the braid and the scalp. This is normal. When that gap exceeds a quarter inch or the braids start lifting off the scalp, it is time to take them down.
Night Protection (Non-Negotiable)
Every single night, put on a silk or satin durag. Cotton pillowcases are the enemy of cornrows. The friction pulls individual hairs out of the braid, creates frizz along the parts, and dries out your hair. A durag compresses everything down and maintains the pattern. If you do not own a silk durag, a satin bonnet or a satin pillowcase works as a backup. But a durag is the best tool because it provides even compression across the entire head.
Scalp Care Under Cornrows
Your scalp does not stop needing attention just because your hair is braided. In fact, cornrows can create specific scalp issues if you ignore them.
Itching
Scalp itching in the first 24 to 48 hours after braiding is common and usually caused by tension and the scalp adjusting to the pull. After that initial period, persistent itching usually means dryness or product buildup. Address it with a lightweight oil applied directly to the scalp, not by scratching through the braids with your fingernails. Scratching disrupts the braid pattern and can cause infection if you break the skin.
If itching persists beyond the first week and is accompanied by flaking or redness, you may have a buildup issue. A diluted apple cider vinegar rinse (one part ACV, three parts water) applied with a spray bottle can help rebalance scalp pH without disturbing the braids.
Dryness
Cornrows expose more of your scalp to air and sun than loose natural hair does. The scalp along the parts can dry out quickly, especially in winter or in dry climates. Keep a scalp oil in rotation and apply it along the parts every one to two days. Avoid petroleum-based products because they seal in whatever is on your scalp (including sweat and dirt) rather than actually moisturizing. (We recommend this Jack Black Nourishing Hair & Scalp.)
Buildup
Heavy gels, butters, and pomades do not play well with cornrows. The product sits on the braid surface, attracts dust and lint, and hardens over time. Stick to lightweight water-based products and oils. If you used Eco Styler Olive Oil Gel or similar during the braiding process, that is fine for installation. Just do not keep reapplying heavy gels during the weeks the braids are in.

Sun Protection
The exposed scalp along your parts can sunburn, and on darker skin tones, sun damage shows up as hyperpigmentation rather than redness. If you are going to be outdoors for extended periods, wear a hat or apply a scalp sunscreen spray to the parts. This is especially important during summer months.
When to Take Cornrows Out
Knowing when to take out cornrows is just as important as knowing how to put them in. Leaving them in too long causes real damage.
Take them out when:
- You hit the four-week mark (hard maximum for most men)
- New growth creates a visible gap of more than a quarter inch between the braid base and the scalp
- The braids feel loose and shift when you touch them
- Your scalp is consistently itchy, flaky, or irritated despite maintenance
- You notice thinning around the hairline or temples
- Frizz along the parts makes the braids look messy even after edge control
How to take them out without damage:
- Apply a generous amount of conditioner or oil to each braid. This adds slip and makes it easier to unravel without pulling.
- Cut the rubber bands or thread at the ends. Never yank them off.
- Starting from the ends, gently unravel each braid by reversing the braiding motion. Do not pull the braid apart from the middle.
- Once unraveled, finger-detangle the section before moving to the next braid. Do not comb. Your hair will have significant shed hair trapped in the braids (this is normal; you shed about 50 to 100 hairs per day that get caught in the braid pattern). Finger detangling removes the shed hair gently.
- After all braids are out, deep condition immediately. Your hair needs moisture after weeks of being in a braided pattern.
If you are transitioning to a different style like an afro or locs, check our guides on how to grow an afro or how to get dreads for what to do after takedown.
DIY Cornrows vs. Professional Braiding
Let me be honest about this: braiding your own cornrows is hard. It is possible, and plenty of men do it, but the learning curve is steep. Here is a realistic breakdown.
DIY Cornrows
| Pros | Cons |
|---|---|
| Free once you own the tools ($15-25 total) | 2-3 hour learning curve on the first attempt |
| Braid on your own schedule | Back rows are extremely difficult to reach |
| Control your own tension | Parts will not be as clean as a professional’s |
| Skills improve with every session | Arm fatigue is real (braiding above your head for hours) |
My recommendation for DIY beginners: Start with four to six wide straight-back rows. Wide sections are more forgiving than thin ones. Use two mirrors (one in front, one behind) so you can see the back of your head. Accept that your first attempt will not look like what you see on Instagram. By the third session, you will notice a significant improvement.
Professional Braiding
| Pros | Cons |
|---|---|
| Clean, precise parts and patterns | $50-150+ per session (depending on pattern and location) |
| Faster (45 min to 2 hrs for experienced braiders) | Finding a good braider takes research |
| Complex patterns (fishbone, zig-zag) done right | You are on someone else’s schedule |
| Even tension throughout | Some braiders pull too tight (communicate your limits) |
How to find a good braider:
- Check Instagram portfolios. Look for clean parts, even braids, and photos showing the braids from multiple angles.
- Ask in your community. Barbershops often have a braider on staff or can recommend one.
- On your first visit, communicate clearly about tension. Say “I prefer snug but not tight” before they start. A good braider will check in during the process.
- If you feel sharp pain or see white bumps forming at the base of the braids, speak up immediately. Do not suffer through it.
For complex patterns like fishbone, zig-zag, or elaborate geometric designs, go to a professional. The precision required is not realistic for self-braiding, especially at the back of your head. Save your DIY efforts for straight-back and simple side cornrows.
Cornrows and Hair Growth
Cornrows are classified as a protective style because they tuck your ends away from friction, wind, and manipulation. When worn correctly, they promote length retention by minimizing breakage. This is why cornrows are a popular choice for men growing out their hair for locs, an afro, or just more length overall. When it comes to how to do cornrows, technique matters most.
However, cornrows only protect your hair if the braiding tension is appropriate and you do not leave them in too long. As I mentioned in the tension section, chronic tight braiding causes traction alopecia, which is hair loss from repeated pulling at the follicle. Traction alopecia is particularly common along the hairline and at the temples, and it often starts as a gradual thinning that you might not notice until it becomes permanent. When it comes to how to do cornrows, technique matters most.
If you are using cornrows as a growth strategy, follow these rules:
- Rebraid every two to three weeks. Do not leave them in for six or eight weeks hoping for extra growth.
- Alternate between braided styles and loose styles. Do not keep your hair in cornrows 52 weeks a year.
- Use feed-in cornrows at the hairline to minimize tension on the most vulnerable follicles.
- Deep condition after every takedown before rebraiding.
- If you notice thinning at the hairline, stop braiding that area for at least a month and consult a dermatologist experienced with hair loss in textured hair.
For a complete guide to growing your natural hair, our how to grow 4C hair article covers retention strategies, product recommendations, and realistic timelines for every stage of growth.
Common Mistakes (and How to Avoid Them)
I have been doing and watching cornrows my entire life. These are the mistakes I see over and over.
1. Braiding on Dirty Hair
Leads to itching, flaking, and odor within the first week. Always wash, condition, and moisturize before braiding. No shortcuts.
2. Uneven Sections
One row wider than the next makes the entire head look off. Take time on your sectioning. It is the foundation of the entire style.
3. Braiding Too Tight
The most common and most damaging mistake. Pain is not part of the process. If it hurts, loosen up. Traction alopecia is not worth any hairstyle.
4. Skipping Night Protection
No durag means frizzy, loose braids by day five. A $5 silk durag adds a full week of clean wear to your cornrows. There is no excuse for skipping it.
5. Leaving Cornrows in Too Long
Four weeks is the maximum. After that, the new growth starts matting at the base of the braid, and you risk tangling that leads to breakage during takedown.
6. Using Heavy Products During Wear
Save the heavy gels and butters for installation only. During the weeks you wear the style, stick to lightweight oils and water-based sprays. Heavy products harden, attract lint, and cause buildup that is difficult to wash out without taking down the braids.
7. Rushing the Takedown
Pulling braids out quickly rips out healthy hair along with the shed hair trapped in the braid. Apply conditioner, work slowly from the ends, and finger-detangle each section. Budget at least 30 to 45 minutes for a full takedown.
Products for Cornrows
You do not need a cabinet full of products. Here are the essentials I recommend, broken down by purpose.
| Product | Purpose | Best For | Est. Price |
|---|---|---|---|
| Cantu Shea Butter Leave-In Conditioner | Pre-braid moisture and slip | 4B/4C hair, detangling before braiding | $5-8 |
| SheaMoisture Jamaican Black Castor Oil | Pre-braid oiling, scalp moisture | All hair types, scalp health | $10-13 |
| Jamaican Mango & Lime Locking Gel | Securing braid ends, edge hold | Shorter hair, end finishing | $5-8 |
| Design Essentials Honey & Shea Edge Tamer | Edge control during wear | Daily maintenance, flyaway smoothing | $8-12 |
| Mielle Rosemary Mint Scalp Oil | Scalp moisture between rebraids | Dry or itchy scalp, daily use | $9-12 |
| Eco Styler Olive Oil Gel | Hold during braiding installation | Budget option, strong hold | $3-6 |
| Murray’s Beeswax | Extra hold for braids on coarse hair | 4C hair, braids that need strong grip | $3-5 |
All of these are under $15 individually. Your total kit cost for cornrow maintenance, including tools and products, should run about $40 to $60. Compare that to $100+ per professional braiding session and the math makes sense for learning to DIY, even if the first few attempts are rough.
If you are also looking for products that work well with 4C hair in general, not just for cornrows, our best gel for 4C hair roundup and best curly hair products for men guide cover a wider range of options.
Cornrow Styles to Try
Once you have the basic technique down, here are some specific styles to work toward. I am ordering these by difficulty so you can progress through them.
Beginner Styles
- 6-8 straight-back rows: Wider rows, simpler parts, good for first-timers. Wear time: 2-3 weeks.
- Two cornrows (double braids): Just two thick braids running from front to back, one on each side of a center part. Simple and quick. Wear time: 1-2 weeks.
- Cornrows with a fade (straight-back top only): Get a fade from your barber, then braid just the top section. Fewer braids to manage, clean look. Wear time: 2-3 weeks.
Intermediate Styles
- 10-14 thin straight-back rows: Tighter sections require more precision. The extra rows create a more intricate look. Wear time: 3-4 weeks.
- Side-swept cornrows: Braids running diagonally from one side to the other. Requires comfort braiding at an angle. Wear time: 2-3 weeks.
- Feed-in cornrows: Thin starts that gradually thicken. Better for hairline health. Wear time: 2-4 weeks.
Advanced Styles (Professional Recommended)
- Zig-zag cornrows: Angular parts and direction changes mid-braid. Wear time: 3-4 weeks.
- Fishbone pattern: Central braid with diagonal branches. 2-3 hour installation. Wear time: 3-4 weeks.
- Geometric/freestyle: Custom patterns including curves, spirals, or personalized designs. Requires a skilled braider who can execute your vision. Wear time: 3-4 weeks.
Frequently Asked Questions
How long does it take to cornrow a full head?
For a skilled braider doing straight-back cornrows on a man’s head, expect 45 minutes to two hours depending on the pattern complexity and hair length. Beginners doing their own hair should plan for two to three hours on the first attempt. More intricate patterns like zig-zag or fishbone take longer. Speed improves dramatically with practice, and most people cut their braiding time in half after three or four sessions.
How long do cornrows last on men?
Cornrows typically last two to four weeks with proper maintenance. The timeline depends on hair texture, how active you are, and how well you protect them at night. 4C hair tends to hold cornrows the longest because the tight coil grips the braid pattern. Sleeping with a silk or satin durag extends the life by at least a week. After four weeks, most cornrows start to look fuzzy at the roots and should be taken out to prevent matting and breakage.
Can you cornrow short hair?
You need at least two inches of hair length to cornrow. Three to four inches is ideal because it gives you enough hair to grip and feed into each braid. If your hair is shorter than two inches, the braids will slip out within a day or two. If you are growing your hair specifically for cornrows, check our guide on how to grow 4C hair for tips on reaching that length faster.
Do cornrows damage your hair?
Cornrows are a protective style and should not damage hair when done correctly. The risk comes from excessive tension. If the braids are pulled too tight, especially around the hairline and temples, they can cause traction alopecia over time. Signs of too-tight braids include small white bumps along the parts, a burning sensation at the scalp, and headaches in the first 24 hours. A properly braided cornrow should feel snug but not painful.
How do you sleep with cornrows?
Always sleep with a silk or satin durag, bonnet, or pillowcase. Cotton pillowcases create friction that causes frizz, pulls braids loose at the root, and dries out your hair and scalp. Tie a durag snug enough to hold everything in place but not so tight that it leaves pressure marks. This single habit is the biggest factor in whether your cornrows last two weeks or four.
Should you wash your hair before cornrows?
Yes. Always wash, condition, and detangle your hair before braiding. Clean hair braids more smoothly, holds the pattern better, and reduces itching during the weeks you wear the style. Use a moisturizing shampoo and follow with a conditioner or leave-in treatment. Braiding on dirty, product-heavy hair traps buildup against your scalp and can lead to irritation, flaking, and odor within the first week.
What is the difference between cornrows and box braids?
Cornrows are braided flat against the scalp in continuous rows. Box braids hang freely and are braided from box-shaped sections of hair that extend away from the head. Cornrows follow a pattern across the scalp, while box braids dangle down. For men, cornrows are the more common choice because they sit closer to the head and pair well with fades and lineups. Both are protective styles, but cornrows require less length to start and offer more pattern versatility for shorter men’s hairstyles.
Final Thoughts
Learning how to do cornrows is a skill, and like any skill, it takes repetition. Your first attempt will not be perfect. Your fifth attempt will be noticeably better. Your tenth will be the one that makes you wonder why you ever paid someone else.
Here is what to remember:
- Prep is half the work. Clean, conditioned, detangled, moisturized hair is the foundation of every clean cornrow.
- Clean sections make clean braids. Take your time parting. Clip everything down. The braiding part is easier when your sections are precise.
- The technique is cross under, feed in, repeat. Three strands, underhand crosses, new hair added from the scalp with each pass. That is the entire method.
- Tension matters more than speed. Consistent, moderate tension creates braids that hold. Too tight causes damage. Too loose causes braids that unravel.
- Maintenance extends the style. Durag every night, scalp oil every day or two, lightweight products only.
If you are getting cornrows for the first time, start with straight-back rows and a taper fade on the sides. It is a proven combination that looks clean and gives you room to learn the basics before moving to more complex patterns.
Cornrows are more than a hairstyle. They are one of the oldest and most versatile braiding traditions in human history, and they look just as good on a man heading to work as they do on a man heading to a cookout. Learn the technique, respect the craft, and wear them well.
Further reading: For research-backed grooming advice, see Healthline Men’s Health.
Explore more tips at CulturedGrooming.com.
Further reading: For research-backed grooming advice, see Healthline Men’s Health.