Last updated: March 2026 by Marcus Chen-Williams, Founder & Editor
Cutting hair at home used to feel like something only trained barbers could pull off. But in 2026, with better tools, better guides, and a growing movement toward self-sufficiency, more men are learning to handle their own haircuts and their family’s.
This guide breaks down everything you need to get started. Whether you want to maintain a simple buzz cut, attempt your first fade, or cut your kid’s hair without a meltdown, the fundamentals are the same: the right tools, a clear sequence, and the confidence that comes from repetition.
If you have never picked up a pair of clippers before, start here. If you have been cutting for a while but want to tighten up your technique, skip to the sections on blending or fades.
Why More Men Are Cutting Hair at Home
The math is straightforward. A standard men’s haircut runs $30 to $50 in most U.S. cities. Every three to four weeks, that adds up to $500 to $800 per year for one person. A household with two or three boys? You are looking at $1,500 or more annually sitting in barber chairs.

But cost is only part of it. Scheduling haircuts around work, school, and activities is a logistical headache. Walk-in shops mean unpredictable waits. Appointments mean rigid timelines. And if you have a barber who “gets” your hair texture, switching or moving becomes a real problem.
Cutting at home gives you control over timing, cost, and outcome. Once you learn the fundamentals, every haircut after that is free.
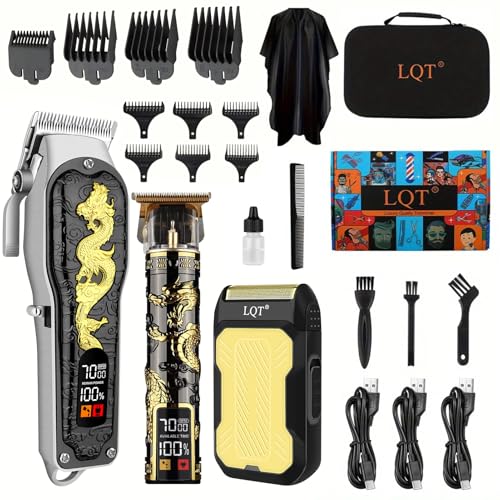
Essential Tools for Home Haircuts
You do not need a barbershop’s worth of equipment. But you do need the right basics. Cheap tools make clean cuts nearly impossible.
Must-Have Tools
| Tool | What It Does | Budget Range |
|---|---|---|
| Professional-grade clippers | Primary cutting tool. Look for adjustable blade, powerful motor, multiple guards. | $50 – $150 |
| Trimmer / edger | Line-ups, neckline cleanup, detail work around ears | $30 – $80 |
| Guard set (sizes 0.5 – 8) | Controls hair length. Metal guards outlast plastic. | Often included with clippers |
| Hand mirror | Seeing the back of your head (essential for self-cuts) | $10 – $20 |
| Barber cape or towel | Keeps hair off clothes and skin | $5 – $15 |
| Spray bottle | Dampening hair for even cutting | $3 – $5 |
| Sectioning clips | Holding longer hair out of the way | $5 – $8 |
Nice-to-Have Additions
- Neck brush for clearing loose hair between passes
- Clipper oil for blade maintenance (extends clipper life significantly)
- Adjustable stool so the person sitting is at the right height
- Good lighting (a ring light or bright overhead lamp eliminates shadows that hide uneven spots)
For a full breakdown of what to buy, see our men’s grooming kit essentials guide. For expert guidance on this topic, consult the American Academy of Dermatology’s skincare routine guide.
Setting Up Your Home Cutting Space
Where you cut matters more than most beginners realize. A good setup prevents mistakes before they happen.
- Lighting: Bright, even light from multiple angles. Overhead fluorescent or a ring light works best. Avoid single-source lighting that casts shadows on one side of the head.
- Surface: Hard floor (tile, wood, concrete). Carpet makes cleanup a nightmare. If you only have carpet, lay down a plastic sheet or old bedsheet.
- Mirror placement: One mirror in front at eye level, one hand mirror for checking the back. Some home barbers mount a second mirror on the opposite wall.
- Height: The person getting the cut should sit so their head is at your chest to chin level. Too low and you will hunch. Too high and you lose control of the clippers.
Understanding Clipper Guards and Lengths
Guard numbers correspond to hair length. This is the foundation of every clipper cut.
| Guard # | Length (inches) | Length (mm) | Best For |
|---|---|---|---|
| 0 (no guard) | 1/16″ | 0.5mm | Skin fades, bald fades |
| 0.5 | 1/16″ | 1.5mm | Very close fade work |
| 1 | 1/8″ | 3mm | Low fades, short buzz |
| 2 | 1/4″ | 6mm | Standard short cut |
| 3 | 3/8″ | 10mm | Medium length all-over |
| 4 | 1/2″ | 13mm | Longer buzz, crew cut top |
| 5 | 5/8″ | 16mm | Textured top length |
| 6 | 3/4″ | 19mm | Longer styles |
| 7 | 7/8″ | 22mm | Long top, short sides |
| 8 | 1″ | 25mm | Maximum clipper guard length |
The golden rule: always start longer than you think you need. A #4 that is too long can become a #3. A #2 that is too short cannot become a #3.
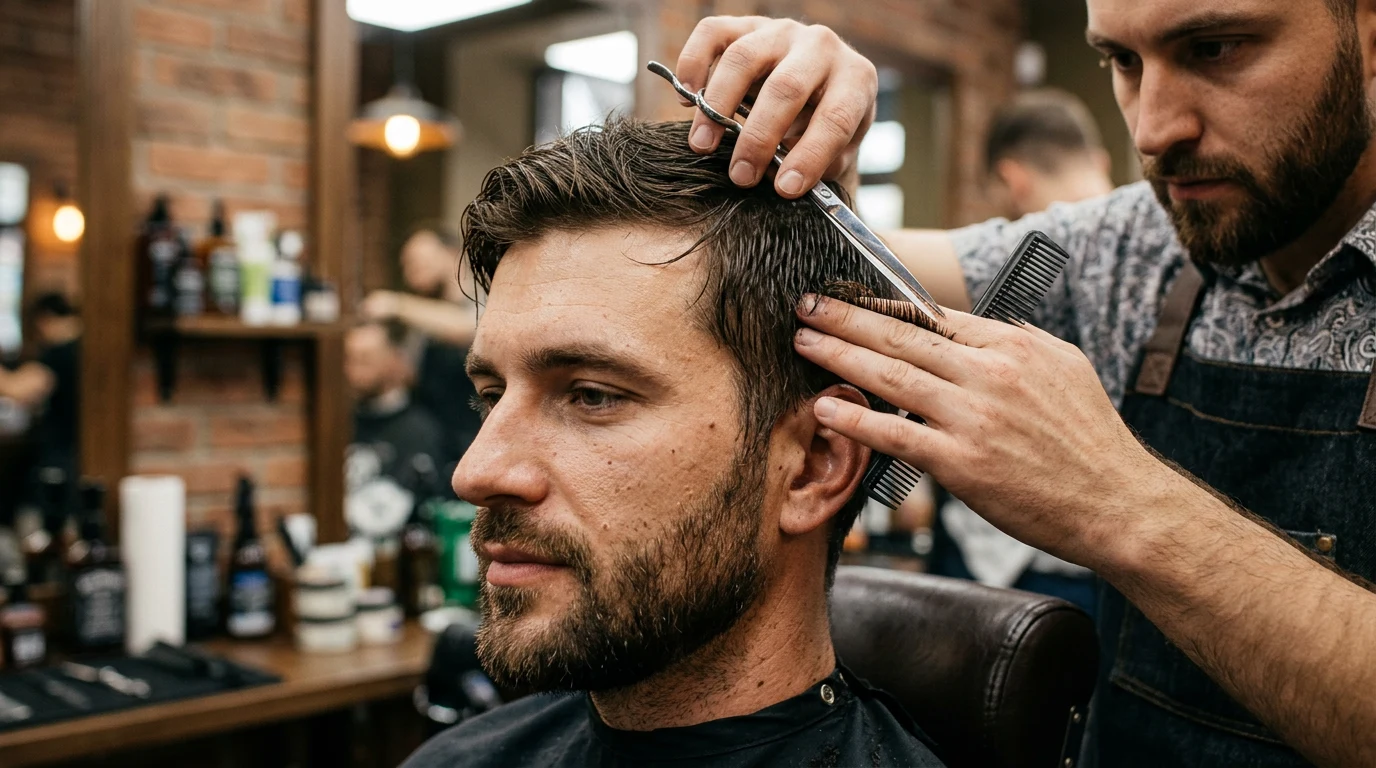
Step-by-Step: Your First Home Haircut
This sequence works for a basic, clean cut with shorter sides and a slightly longer top. It is the foundation that every other style builds on.
Step 1: Prep
- Wash and towel-dry hair (damp, not soaking)
- Cape up, clear the workspace
- Oil your clipper blades
- Select your starting guard (sides) and top guard
Step 2: Sides and Back
- Attach your sides guard (commonly #2 or #3)
- Start at the bottom of the sideburn area
- Move the clipper upward against the grain, stopping at the point where sides meet the top (the “break line”)
- Work around the entire head: sides, behind the ears, and back
- Use smooth, confident strokes. Hesitant, choppy movements create uneven patches.
Step 3: Top
- Switch to a longer guard (commonly #5 to #8, depending on desired length)
- Run the clipper from front to back across the top of the head
- Overlap each pass slightly to avoid missed strips
- For a natural look, go with the grain on the top
Step 4: Blend the Transition
The transition between the shorter sides and longer top is where most beginners struggle. This is called blending. For more guidance, Consumer Reports provides expert resources on product testing.
- Use the guard size between your sides and top (e.g., if sides are #2 and top is #5, blend with #3 and #4)
- Focus on the area where the two lengths meet
- Use a “flicking” motion: guide the clipper upward and flick outward at the blend line
- Work in small sections, checking frequently with the mirror
Step 5: Clean Up
- Switch to a trimmer (no guard) for the neckline
- Create a clean line across the back of the neck (natural or squared, your preference)
- Clean up around the ears
- Edge the sideburns to match
- Brush away loose hair, check all angles with both mirrors
If you want a structured, video-guided version of this process, the Home Haircutting Mastery course walks through every step with visual demonstrations. It was built specifically for beginners and covers everything from tool selection to advanced fades.

- 【PROFESSIONAL HAIR CLIPPERS SET】The LQT professional hair clipper set perfectly
- 【UPGRADE ACCESSORIES】 The LQT clippers for men equipped with 4 guide combs(,3,6,
- 【POWERFUL MOTOR & LARGR CAPACITY BATTERY】The LQT clippers for hair cutting conta
How to Blend Hair Properly
Blending is the skill that separates a “home haircut” look from a professional-looking result. It takes practice, but the technique itself is straightforward.
There are three main blending methods:
- Guard stepping: Moving through consecutive guard sizes at the transition zone. Simple, reliable, works for most cuts.
- Clipper over comb: Running the clipper over a comb held at an angle. Gives more control for longer-to-shorter transitions.
- Lever technique: Opening and closing the clipper’s taper lever mid-stroke. This adjusts blade length on the fly and is essential for skin fades.
Start with guard stepping. It is the most forgiving. Once you are comfortable with that, experiment with the lever technique for smoother gradients.
Fades at Home: What You Need to Know
A fade gradually tapers hair from very short (or skin) at the bottom to longer at the top. It is the most requested style in barbershops and the most satisfying to master at home.
There are three primary fade heights:
| Fade Type | Where It Starts | Difficulty | Best For |
|---|---|---|---|
| Low fade | Just above the ear | Beginner-friendly | Conservative, professional look |
| Mid fade | Temple level | Intermediate | Versatile, works with most face shapes |
| High fade | Above the temples | Advanced | Bold, modern, maximum contrast |
| Skin/bald fade | Fades to skin (no guard) | Advanced | Sharpest look, requires precision |
For a full walkthrough, see our dedicated guide on how to do a fade at home for beginners. We also cover culture-specific fade techniques in our guides for Black men’s hair and Latino hair.
Cutting by Hair Type and Texture
Hair texture changes everything about how you approach a cut. What works on straight, fine hair will not work on coily 4C hair or thick, coarse Asian hair. Knowing your texture determines your guard selection, cutting direction, and finishing technique.
Straight, Fine Hair
Fine hair shows every imperfection. Uneven spots that would be hidden in thick or curly hair are visible immediately. The upside: fine hair is the easiest texture to cut with clippers because it lays flat and feeds smoothly through the guards. Use sharp blades (dull blades pull fine hair painfully) and make slow, deliberate passes.
Thick, Coarse Hair
Thick hair resists clippers more, which means you need a more powerful motor and may need to make multiple passes over the same area. Do not force the clipper through. Let the blade do the work. Take smaller sections and move more slowly. Thick hair is common across many ethnicities, and our Asian men’s hair guide covers specific techniques for managing density.
Curly and Coily Hair
Curly hair has a tendency to “spring up” when cut, meaning it looks longer when wet or stretched but appears much shorter when it curls back up. Always cut curly and coily hair dry unless you are doing a close clipper cut. Account for 20-40% shrinkage depending on curl tightness. Read our complete guide on cutting Black men’s hair at home for texture-specific fade and lineup techniques.
Cutting Kids’ Hair at Home
Cutting a child’s hair introduces a variable that no tool can solve: movement. Kids fidget, turn their heads, and panic at the sound of clippers near their ears. The technique matters, but so does the environment and approach.
- Timing: Cut after a meal and after screen time has started (distraction is your ally)
- Sound exposure: Let them hear the clippers running before you touch their hair. Desensitize first.
- Positioning: Have them sit on a booster or stool at your chest height. A parent’s lap works for very young children.
- Speed: Work quickly but calmly. Nervous energy transfers to kids.
- Praise constantly: “You’re doing great” goes further than “hold still.”
The Home Haircutting Mastery course includes an entire module on child management and positioning techniques. It was created by a barber who grew up in a household of seven boys and has spent 15+ years cutting children’s hair professionally. If keeping kids calm during cuts is your biggest challenge, that module alone is worth exploring.
For more detail, see our full guide on how to cut kids’ hair at home.
Common Mistakes and How to Fix Them
| Mistake | Why It Happens | How to Fix It |
|---|---|---|
| Visible lines between guard lengths | Rushed blending, skipping intermediate guards | Go back with the in-between guard and use a flicking motion at the transition zone |
| One side shorter than the other | Inconsistent pressure or angle | Use the mirror to compare both sides frequently. Match guard position and stroke count. |
| Patchy spots on top | Missed strips, inconsistent passes | Make overlapping passes, going front-to-back AND back-to-front |
| Neckline too high or crooked | Guessing instead of using reference points | Use the bottom of the ear as a guideline. Connect both ears with a gentle curve. |
| Clipper pulling hair | Dull blades, insufficient oiling | Oil blades before every cut. Replace blades annually. |
| Hair too short | Started with too small a guard | Cannot be fixed immediately. Wear it and learn for next time. Start longer. |


- NAIL CARE KIT from 3 Swords Germany with professional manicure and pedicure tool
- CONTENTS: Cuticle scissors, nail scissors, cuticle nipper, nail nipper, tweezers
- STEEL IMPLEMENTS: Hand made, bright nickel plated (protection against corrosion)
Maintaining Your Tools
A $100 clipper maintained properly will outperform a $200 clipper that is neglected. Maintenance is simple and takes two minutes.
- After every cut: Brush hair out of the blades. Apply 2-3 drops of clipper oil. Run the clipper for 10 seconds to distribute.
- Weekly (if cutting frequently): Remove the blade, clean underneath with a small brush or compressed air.
- Every 3-6 months: Check blade alignment. If hair pulls instead of cuts smoothly, realign or replace blades.
- Storage: Keep clippers in a case or pouch. Do not leave them loose in a drawer where the blade can get knocked out of alignment.
Culture-Specific Guides
Hair texture, density, growth patterns, and styling traditions vary significantly across cultures. A technique that works perfectly on straight European hair may produce poor results on coily African-American hair or thick East Asian hair. That is why we have created dedicated guides for specific hair types:
- How to Cut Black Men’s Hair at Home (4C textures, lineups, wave maintenance, temple fades)
- How to Cut Latino Hair at Home (thick straight/wavy hair, Edgar cuts, low skin fades)
- How to Cut Asian Men’s Hair at Home (coarse, straight hair, two-block cuts, textured tops)
- How to Cut Kids’ Hair at Home (child management, age-appropriate styles, first haircut prep)
- How to Do a Fade at Home (universal fade technique guide)
When to Consider a Structured Course
Guides like this one cover the fundamentals, but written instructions have limits. If you learn better from video demonstrations, or if you want a complete system that takes you from zero to confident in under a week, a structured course can compress months of trial-and-error into a clear sequence.
The Home Haircutting Mastery program is built specifically for parents and beginners. It was developed by a professional barber with 15+ years of experience, and it covers tool selection, proper technique, child positioning, clean fades, troubleshooting, and finishing details. It includes a 7-day confidence guarantee.
Three tiers are available:
| Tier | Price | What’s Included |
|---|---|---|
| Basic | $199 | Full course: tools, technique, step-by-step systems, troubleshooting |
| Standard | $249 | Everything in Basic + advanced styles and detailed fade training |
| Elite | $450 | Everything in Standard + 1-on-1 accelerated guidance |
It is not required to cut hair at home. Plenty of people learn from free resources and practice. But if you value a structured system over piecing together random YouTube videos, it is worth looking at.
Frequently Asked Questions
Can I cut my own hair at home with no experience?
Yes. With a structured system, the right clippers, and a basic understanding of guard lengths, anyone can learn to cut hair at home. The key is following a repeatable sequence rather than improvising. Most beginners produce clean results within their first three attempts when using a step-by-step framework.
What tools do I need to cut hair at home?
At minimum, you need a quality clipper set with multiple guard sizes, a hand mirror (for seeing the back), a cape or towel, sectioning clips, and a spray bottle. For fades and detailed work, add a trimmer for line-ups and edging. Avoid cheap clippers with plastic guards that skip or snag.
How much money can I save cutting hair at home?
The average men’s haircut costs $30 to $50 every three to four weeks. That adds up to $500 to $800 per year for one person. A quality clipper set costs $50 to $150 and lasts years. Most families recoup their investment within two to three months.
Is it hard to do a fade at home?
Fades require more technique than a uniform buzz cut, but they are absolutely learnable. The secret is blending between guard lengths using a rocking motion with the clipper. Start with a simple low fade before attempting skin fades. Our guide on how to do a fade at home for beginners walks through the exact process.
How long does a home haircut take?
For beginners, expect 30 to 45 minutes for a full cut. As you build muscle memory and confidence, most home haircuts take 15 to 25 minutes. Fades and detailed styles take longer than simple buzz cuts or tapers.
What is the biggest mistake beginners make when cutting hair at home?
Going too short too fast. Always start with a longer guard than you think you need. You can always take more off, but you cannot put hair back on. The second most common mistake is rushing the blending between guard lengths, which creates visible lines.
Can I cut curly or textured hair at home?
Yes, though textured hair requires specific adjustments. Curly hair should be cut dry (wet curly hair springs up shorter than expected), and you need to account for 20-40% shrinkage. Our cultural-specific guides cover techniques for Black men’s hair, Latino hair textures, and Asian hair types.
The Bottom Line
Cutting hair at home is a practical skill that saves money, eliminates scheduling stress, and gives you complete control over the outcome. The learning curve is real but short. Most people are surprised at how quickly the process becomes routine once they follow a clear system.
Start with a simple cut on a longer guard. Get comfortable with the clippers. Then gradually work toward fades and more detailed styles. The tools are affordable, the technique is learnable, and the payoff lasts a lifetime.